因为个人玩游戏、看番、看电影有着疯狂截图的习惯,并且想要永久珍藏下体验的过程,所以时常会把这些截图上传到云端。
目前这些内容我还是主要在QQ空间上传,但是,QQ空间有着一个让人不是很满意的地方,就是普通用户上传的图片都会被压缩。身为一个技术,能自己实现的东西,怎么能会去充QQ会员呢!更何况自己的这些数据在别人手上,总有种患得患失的感觉,害怕某天QQ空间的图片服务暂停了,自己多年的记忆岂不是也都灰飞烟灭?
在今天之前,我的个人博客其实已经包含了图片/视频上传的功能,只是每次上传都要一张一张上传。然后可以预先设置名字和描述(当然也可以上传结束再设置)。

这样的功能不能说不能用,只能说偶尔上传一两张图片还有点用。每次都要精挑细选哪些需要上传,然后还要本地打开这张图片,人眼辨别这张图片是否之前上传过了,就很麻烦。从而导致了一个结果,每次新奇体验后的截图,想要上传到个人博客的兴趣不是很高,缺乏了动力。所以也是时候来支持一下批量上传功能了。
基本的需求就是:
1. 能够批量上传图片/视频
2. 批量上传的图片/视频要支持预览
3. 批量上传结束后,要得到每张图片的上传结果,并且直观的展示出来
4. 对于那些上传失败的图片/视频,支持重新上传
未来的优化项:
1. 支持大图预览图片/视频
2. 可以删除掉上传队列的部分图片/视频
因为博客已经有了文件上传图床的封装接口,所以本文在 已有上传单图接口的基础上进行编写。
后端实现
因为要记录每个图片的上传状态,所以对于返回的结果,需要记录下该图片是否上传成功,然后每个图片需要编配编号,来唯一对应每个上传的文件,以供前端同步状态。
返回实体类见下方代码。其中index即为当前文件的唯一编码;code表示上传的状态,如果是0表示上传成功,-1表示失败;msg是状态补充码(可以理解为失败的具体原因码),当失败时,可能还有细分原因,比如我这边的图片存储策略可能的原因有 -1 本地存储失败 -2 本地读取失败 -3 存储数据库失败 -4 其他情况。
package top.dreamcenter.dreamcenter.ret;

import lombok.AllArgsConstructor;
import lombok.Data;
import lombok.NoArgsConstructor;

/**
 * 基础信息
 */
@Data
@AllArgsConstructor
@NoArgsConstructor
public class InfoResult {

    private String index;

    /**
     * 状态
     */
    private Integer code;

    /**
     * 消息
     */
    private String msg;

    /**
     * 成功
     * @return code返回0, 无msg
     */
    public static InfoResult success(String index) {
        return new InfoResult(index,0, null);
    }

    /**
     * 失败
     * @param msg 失败原因
     * @return
     */
    public static InfoResult fail(String index, Object msg) {
        return new InfoResult(index, -1, msg.toString());
    }

}
对于我这边现有的单文件上传接口是 public DogeResult uploadFile(MultipartFile file, Image image),参数file即为要上传的图片,参数2表示额外要修改的图片信息,如文件名称、描述等。所以服务端这边,本质上要做的操作就是,对每个文件单独调用该接口,如果有异常就捕获,并且记录异常原因,最终封装返回即可。
下方函数即为我封装的批量上传接口,其中idList表示的是files文件列表每个文件对应的唯一编码顺序序列,毕竟MultipartFile[]数组并不存储这个唯一编码,只能自己额外补充传递,当然一开始也想到用文件名称添加前缀来解决,但是最终感觉还是不合适,因为我们要的只是纯粹的文件上传功能,不能偏离原始诉求。对于每个文件,如果有统一修改的文件名,则修改显示名字为统一名字,如果没有,显示名字为文件原始名字。在最终返回的结果中,判断是否都成功,都成功,返回状态码200,失败返回-1,但是无论成功还是失败,都要返回本批次处理的结果。
    public RetResult<List<InfoResult>> batchUpload(MultipartFile[] files , Image image, String idList) {
        List<InfoResult> infoResultList = new ArrayList<>();

        int errCount = files.length;

        String[] idArr = idList.split(",");

        if (idArr.length != files.length) {
            return new RetResult<>(ResultCode.FAIL_CODE, "上传队列不匹配!", infoResultList);
        }

        for (int i = 0; i < files.length; i++) {
            MultipartFile current = files[i];
            String idIndex = idArr[i];
            System.out.println(current.getOriginalFilename());

            try {
                // 设置名称
                if(image.getName().trim().equals("")) {
                    image.setName(current.getOriginalFilename());
                }

                // 上传
                DogeResult dogeResult = uploadFile(current, image);
                Integer errno = dogeResult.getErrno();

                // 成功
                if (errno == 0) {
                    infoResultList.add(InfoResult.success(idIndex));
                    errCount--;
                }
                // 失败
                else {
                    infoResultList.add(InfoResult.fail(idIndex, errno));
                }
            } catch (Exception e) {
                // 异常,属于失败情况
                infoResultList.add(InfoResult.fail(idIndex, e.getMessage()));
            }
        }


        if (errCount == 0) return RetResult.success(infoResultList);
        return new RetResult<>(ResultCode.FAIL_CODE, "存在失败上传", infoResultList);
    }
对于controller层,简单返回调用即可。
@PostMapping("/batchUpload")
    public RetResult<List<InfoResult>> batchUpload(@RequestPart MultipartFile[] files , Image image, String idList) {
        return imageService.batchUpload(files, image, idList);
    }
前端实现
在本次批量上传中,逻辑比较复杂的反而是前端页面。在早先的博客设计上,缺乏了组件化思想建设,而最近才开始一点一点的封装组件。我这边前端使用的是Vue。
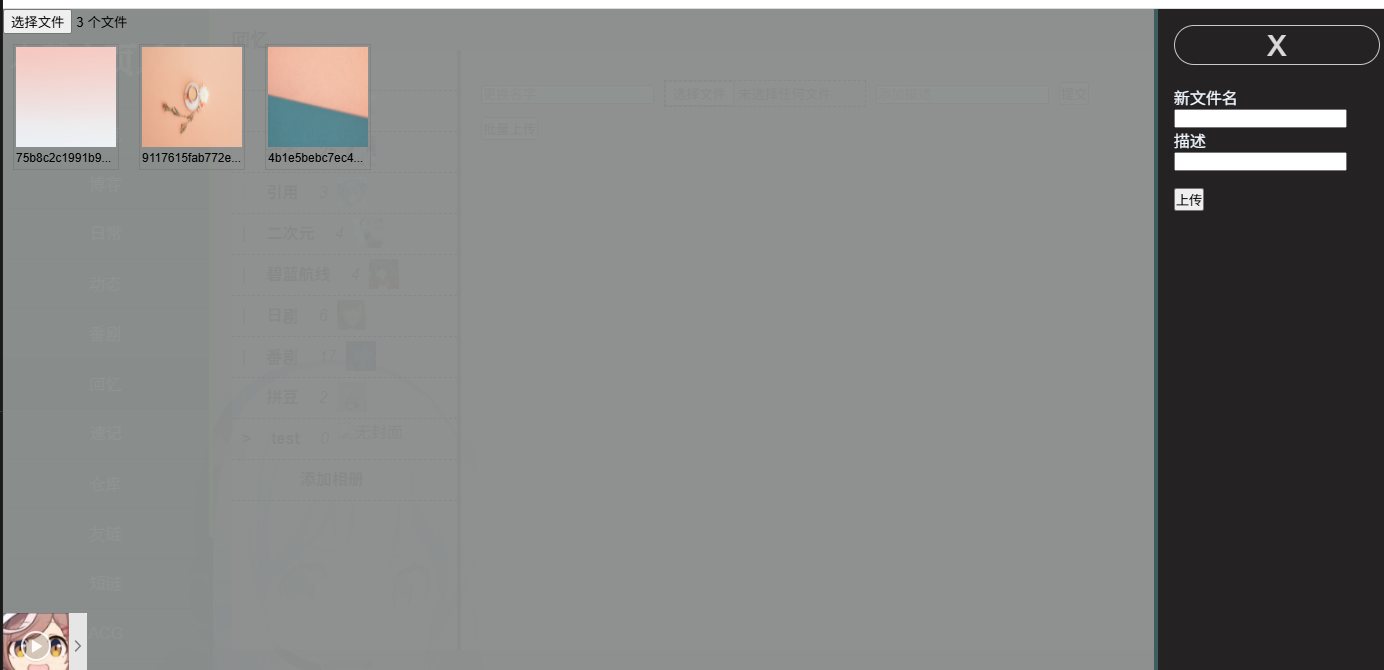
目前该模块用了两个封装组件,一个左右布局组件,一个是消息提示组件。布局组件如下图所示的左边灰色区域,右边黑色区,当变成移动端时,右边栏自动切换到下边。当然本文重点不是讲述这个布局如何实现,而是批量上传如何实现,所以这部分不多赘述,只是批量上传在此组件基础上搭建的,组件名称 screenShow 。

我们依然见上图,整体的功能区域还是很简单的,左边展示即将上传的图片,右边则是额外操作面板。先直接贴批量上传的源码部分。(貌似vue代码没有成功染色![[[疑惑]]](/emoji/yh.jpg) 凑活着看吧)
凑活着看吧)
<template>
  <div>
    <ScreenShow>
      <div slot="left" class="leftBatch">
        <input ref="files" type="file" multiple="multiple" @change="showFiles"/>
        <div class="albumView">
          <div v-for="item in fileList" :key="item.id" class="item">
            <img :src="item.src" width="100" height="100">
            <p v-if="item.uploadRes == ''" class="uploadRes resEmpty">{{ item.uploadRes }}</p>
            <p v-else-if="item.uploadRes == '成功'" class="uploadRes resSuccess">{{ item.uploadRes }}</p>
            <p v-else class="uploadRes resFail">{{ item.uploadRes }}</p>
            <p class="fileName">{{ item.raw.name }}</p>
          </div>
        </div>
      </div>
      <div slot="right" class="rightBatch">
        <div class="closeImg" @click="closeBatchUpload">x</div>
        <label name="newFileName">新文件名</label>
        <br/>
        <input type="text" id="newFileName" v-model="tempName"/>
        <br/>
        <label name="describe">描述</label>
        <br/>
        <input type="text" id="describe" v-model="describe"/>
        <br/><br/>
        <button @click="uploadAllFiles">上传</button>
      </div>
    </ScreenShow>
    <Message @closeMessage="closeMessage" v-if="showMsg">
        <p>{{ msgContent }}</p>
    </Message>
  </div>
</template>

<script>
import axios from 'axios'
import screenShow from '../components/frame/screenShow'
import message from '../components/message.vue'

export default {
  data () {
    return {
      tempName: '',
      describe: '',
      fileList: [],
      msgContent: '',
      showMsg: false
    }
  },
  props: ['aid'],
  components: {
    ScreenShow: screenShow,
    Message: message
  },
  methods: {
    showFiles (event) {
      var that = this
      that.fileList = []
      var files = event.target.files
      for (let i = 0; i < files.length; i++) {
        const file = files[i]

        var reader = new FileReader()
        reader.readAsDataURL(file)
        reader.onload = function (e) {
          that.fileList.push({
            id: i,
            raw: file,
            src: this.result,
            uploadRes: ''
          })
        }
      }
    },
    uploadAllFiles () {
      const req = new FormData()
      req.append('aid', this.aid)
      req.append('name', this.tempName)
      req.append('time', this.$time())
      req.append('describe', this.describe)

      // 将所有未成功的图片上传
      var idList = []
      for (let i = 0; i < this.fileList.length; i++) {
        const tmp = this.fileList[i]
        if (tmp.uploadRes !== '成功') {
          req.append('files', tmp.raw)
          idList.push(tmp.id)
        }
      }
      req.append('idList', idList)

      // 说明全部已上传,无需上传
      if (idList.length === 0) {
        this.msgContent = '已全部上传,无需上传'
        this.showMsg = true
        return
      }

      // 上传
      axios.post('/api/image/batchUpload', req, {
        headers: {
          'Content-Type': 'multipart/form-data'
        }
      }).then(res => {
        console.log(res.data)
        // 染色
        var data = res.data.data
        data.forEach(item => {
          var idIndex = item.index
          var code = item.code
          var msg = item.msg
          // 依据idIndex找到对应文件
          this.fileList.forEach(file => {
            if (file.id === Number.parseInt(idIndex)) {
              if (code === 0) {
                file.uploadRes = '成功'
              } else {
                file.uploadRes = msg
              }
            }
          })
        })
        console.log(data)
      }).catch(err => {
        this.msgContent = '插入图片出现问题,请检查控制台'
        this.showMsg = true
        console.log(err)
      })
    },
    closeBatchUpload () {
      console.log('click close!')
      this.$emit('closeBatchUpload')
    },
    closeMessage () {
      this.showMsg = false
    }
  }
}
</script>

<style lang="scss" scoped>
.leftBatch{
  box-sizing: border-box;
  .albumView{
    display: flex;
    flex-direction: row;
    text-align: center;
    .item{
      box-sizing: border-box;
      width: 106px;
      height: 126px;
      border: 1px solid rgba(73, 73, 73, 0.185);
      margin: 10px;
      overflow: hidden;
      padding: 2px;
      position: relative;
      .fileName{
        overflow: hidden;
        text-overflow: ellipsis;
        white-space: nowrap;
        font-size: 12px;
      }
      .uploadRes{
        box-sizing: border-box;
        position: absolute;
        top: 0;
        width: 100px;
        color: rgb(71, 71, 71);
      }
      .resEmpty {

      }
      .resSuccess {
        background-color: rgb(87, 228, 117);
      }
      .resFail {
        background-color: rgb(238, 86, 81);
      }
    }
  }
}
.rightBatch{
  .closeImg{
    font-size: 40px;
    vertical-align: middle;
    // width: 40px;
    height: 40px;
    border: 1px solid rgb(202, 202, 202);
    color: rgb(218, 218, 218);
    text-align: center;
    line-height: 36px;
    border-radius: 20px;
    box-sizing: border-box;
    margin-bottom: 20px;

    &:hover{
      border: 2px solid ghostwhite;
      color: ghostwhite;
    }
  }
}
</style>
其中该批量上传组件需要一个参数aid,我在props中定义了aid变量,表示的是图片所属专辑,因为我的每个图片都有其所属的专辑,在这里进行了设置,表示其归属于哪个相册。对于数据fileList即为某个图片的基础数据,封装结构为:
{
    id: i,
    raw: file,
    src: this.result,
    uploadRes: ''
}
这个id即为图片唯一编码,后续的状态更新全部依托于该参数;raw即为图片原始对象;src表示即将显示的图片资源,用base64表示;uploadRes表示上传状态,默认为空字符串,表示待上传,如果上传成功,需要更新为“成功”,失败则返回对应的子错误码。图片的预览数据装载使用FileReader类,当装载成功后才加入到集合中。当我们选择了图片并且确认后,就会触发装载渲染图片函数showFiles。效果如下图所示。
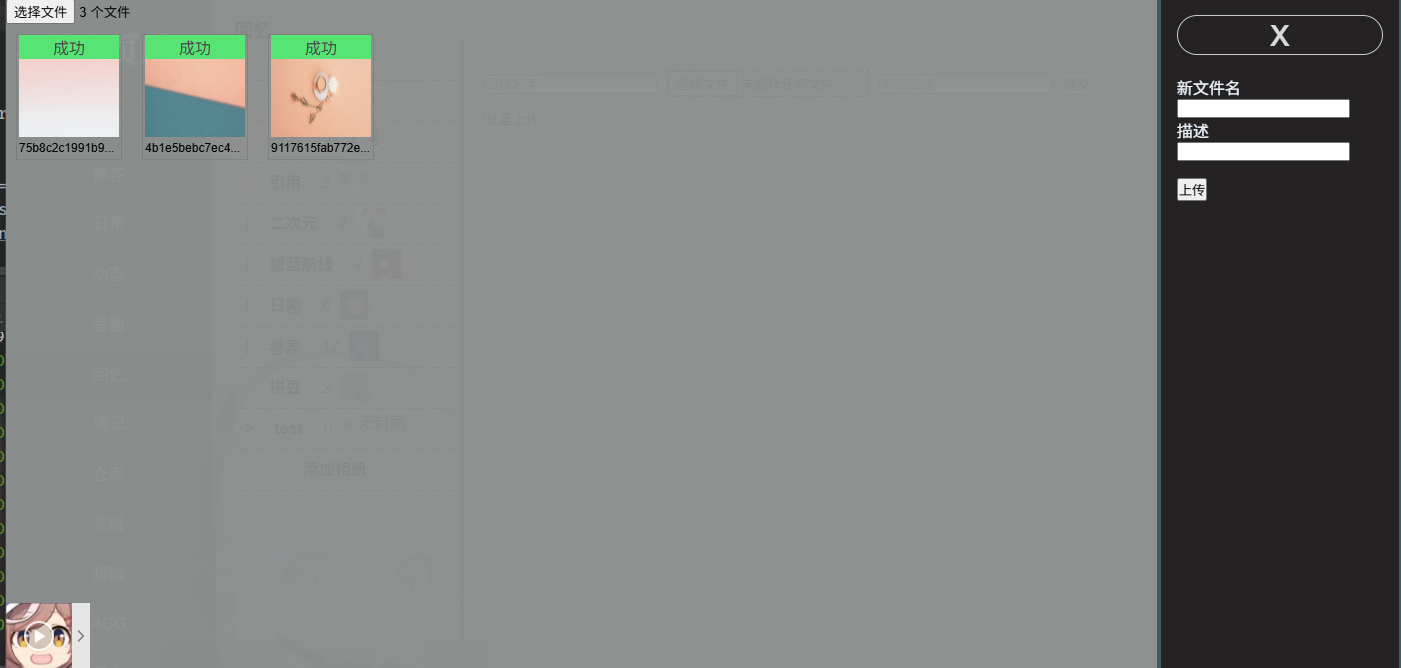
上传函数uploadAllFiles,需要自己封装一个FormData,当调用后端上传接口成功后,则开始进行染色(重渲染组件),唯一对于编号后,更新该图片的状态。上传结束后效果如下图所示。我后端控制了第一张图返回异常,发现全部染色成功了。

后续仍然可以再次点击上传,重新上传也只会上传非成功的图片,我后端去除了异常抛出语句后,最终上传效果如下!
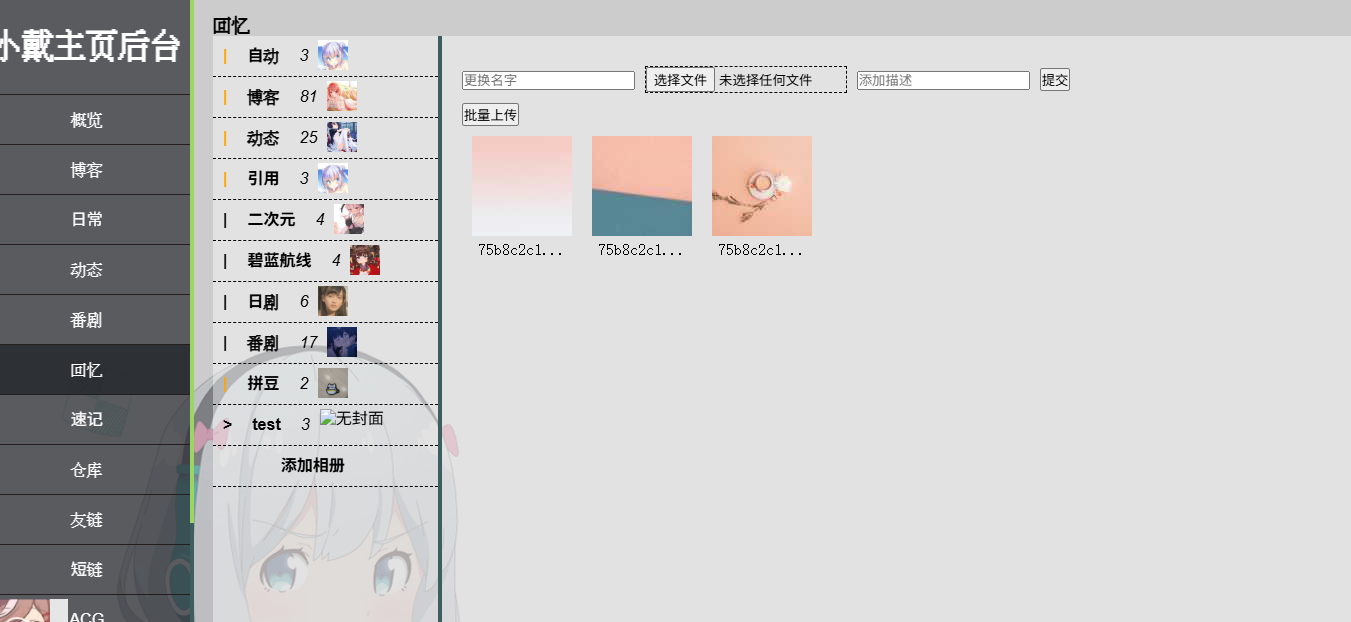
可见非常的完美,后续如果想要继续上传重新选择文件即可,该页面不会立即退出。当点击右上角的关闭按钮后,重新渲染列表,即可在该专辑下成功预览到图片啦!
整体其实并没有什么技术难点,原来真正阻碍我的,不是技术,而是对新需求的接受阻碍罢了。当我们坦然面对,冷静分析清除需求后,世上也就没有解决不了的问题啦!
鸡汤灌完,结束!
![[[爽啊]]](/emoji/sa.jpg)
应该不算水文吧QAQ